ARIVE + PwrTPO: Simplifying the Way You Register Loans and Submit Docs

.png)
If you use ARIVE as your loan origination system or point of sale, there's a feature you need to know about. If you're already a PwrTPO partner, it's available to you right now.
ARIVE integrates directly with TPO Connect, allowing mortgage professionals who work in ARIVE to register loans with PwrTPO and submit documents without ever leaving the platform. No downloading files. No logging into a separate portal. No re-uploading documents you already have.
The integration with ARIVE is designed to save you time and reduce friction on every file.
What Is ARIVE?
ARIVE is a loan origination and point-of-sale platform built for the TPO channel, specifically mortgage brokers and mortgage bankers. Many mortgage professionals use ARIVE as their primary system for managing borrower data, pricing loans, and generating disclosures.
Because ARIVE is built with the broker and TPO relationship in mind, it also supports direct lender integrations which is exactly where PwrTPO comes in.
How the PwrTPO + ARIVE Integration Works
Once PwrTPO is connected as your lender inside ARIVE, two key workflows become available to you:
1. Loan Registration Without the Extra Steps
Traditionally, registering a loan with a wholesale lender means exporting a 3.4 MISMO file from your LOS, logging into the lender's portal, and uploading that file manually. With the ARIVE integration, that entire process happens from inside your existing workflow:
- Price PwrTPO inside ARIVE using real-time products andrates.
- Select your rate and product and apply it directly to theloan file
- Navigate to the Loan Center tab and click Register Loan
- ARIVE sends the loan information to PwrTPO automatically
- A confirmation appears once registration is complete, with alink to the PwrTPO portal for reference
No file export. No separate login. No manual upload. The loan is registered with us while you stay in ARIVE.
2. Document Submission from the Documents Tab
Once a loan is registered with PwrTPO through ARIVE, document submission works the same way directly from inside the platform:
- Go to the Documents tab on the loan file
- Select the documents you want to send to PwrTPO
- Click the Upload to PwrTPO button at the bottom of ARIVE
- Choose the submission type Initial Submission, PTDconditions
- Confirm and click Start Upload
- A confirmation screen shows that your documents have beensuccessfully submitted
Documents sent this way go directly into the Initial Upload Folder in the PwrTPO (TPO) portal, where our team begins processing them immediately.
Important note: Document submission through ARIVE is only available for loans that were originally registered with PwrTPO via ARIVE. If you registered the loan through our portal directly, document submission through ARIVE will not be available for that file.
What This Means for Your Pipeline
For mortgage professionals already working in ARIVE, this integration eliminates the back-and-forth between systems that slows files down. Here's the short version of what changes:
Without the integration: Export MISMO file → log into PwrTPO portal → upload file to register → download borrower docs → log back into portal → upload docs to loan file.
With the integration: Stay in ARIVE. Register. Submit. Done.
Fewer steps means fewer chances for delays, missed uploads, and more time spent on what actually moves loans forward.
Getting Started
If you're already a PwrTPO partner and use ARIVE as your LOS or POS, you can set up this connection today. Here's how to get started:
- Make sure PwrTPO is added as a lender connection insideARIVE
- Price your next loan scenario using the Products &Pricing section in ARIVE select PwrTPO as the lender
- Follow the steps above to register and submit documents whenyour file is ready
Not a PwrTPO partner yet? Visit pwrtpo.com to get approved and your Account Executive will walk you through connecting ARIVE from day one.
Have questions about a specific file or the ARIVE setup? Reach out to your Account Executive directly we're here.
For technical support with ARIVE, you can use the chat feature inside the platform, email support@arive.com, or call 888-34-ARIVE.
PWRTPO + ARIVE
Step-by-Step Visual Walkthrough
How to Price, Register, and Submit Documents to PwrTPO Directly from ARIVE
This walkthrough covers the full workflow for mortgage professionals who use ARIVE as their loan origination system and want to register loans and submit documents to PwrTPO without leaving the platform. The steps below are organized into three parts: Pricing, Registration, and Document Submission. For technical support with ARIVE: support@arive.com or 888-34-ARIVE.
PART 1: PRICING YOUR LOAN
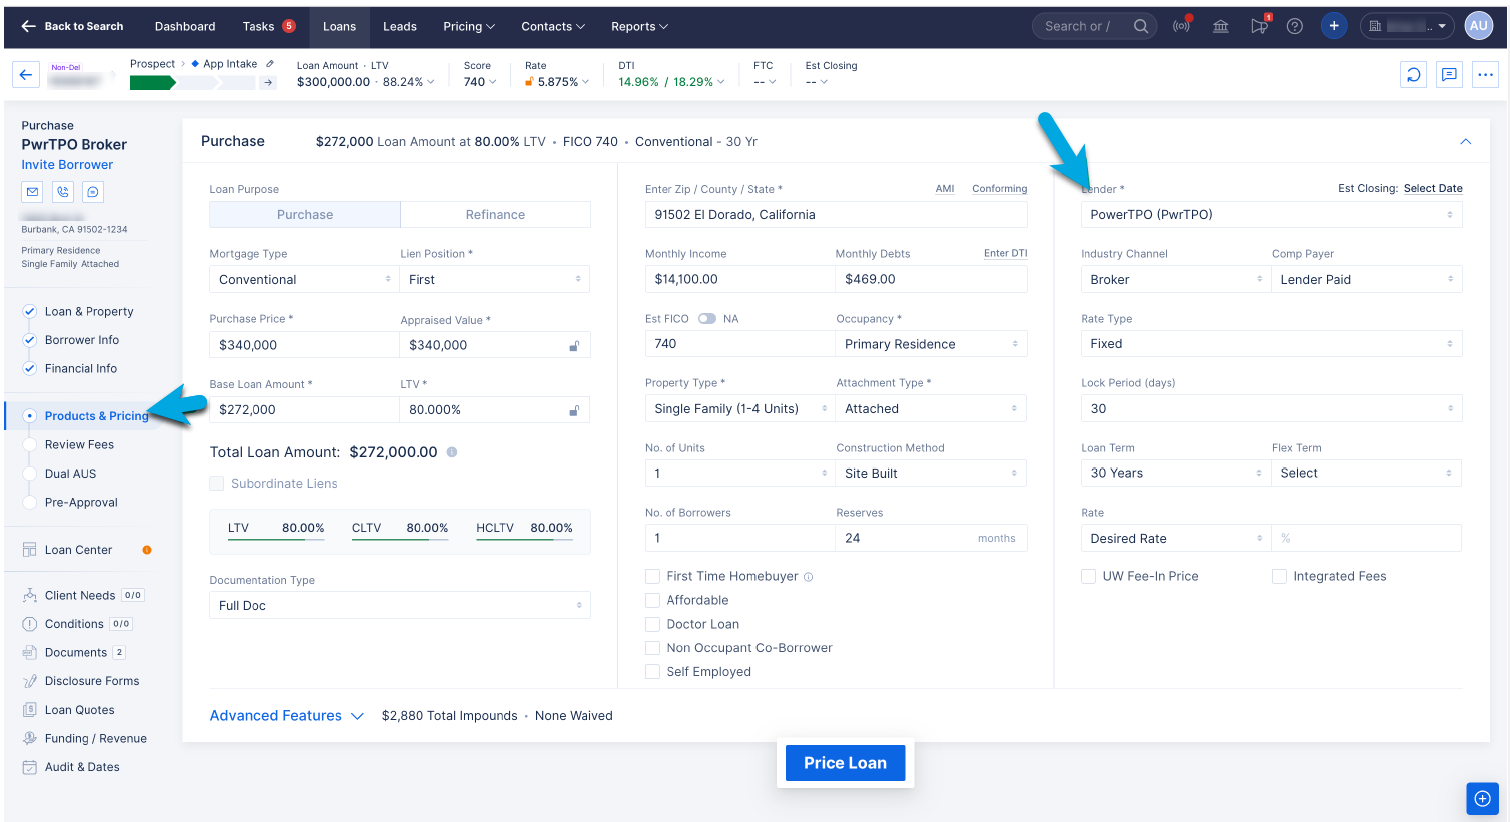
STEP 1- Price PwrTPO in ARIVE
Navigate to Products & Pricing in the left sidebar. Make sure PowerTPO (PwrTPO) is selected as your lender in the upper right of the pricing form. Fill in your loan scenario details and click Price Loan.
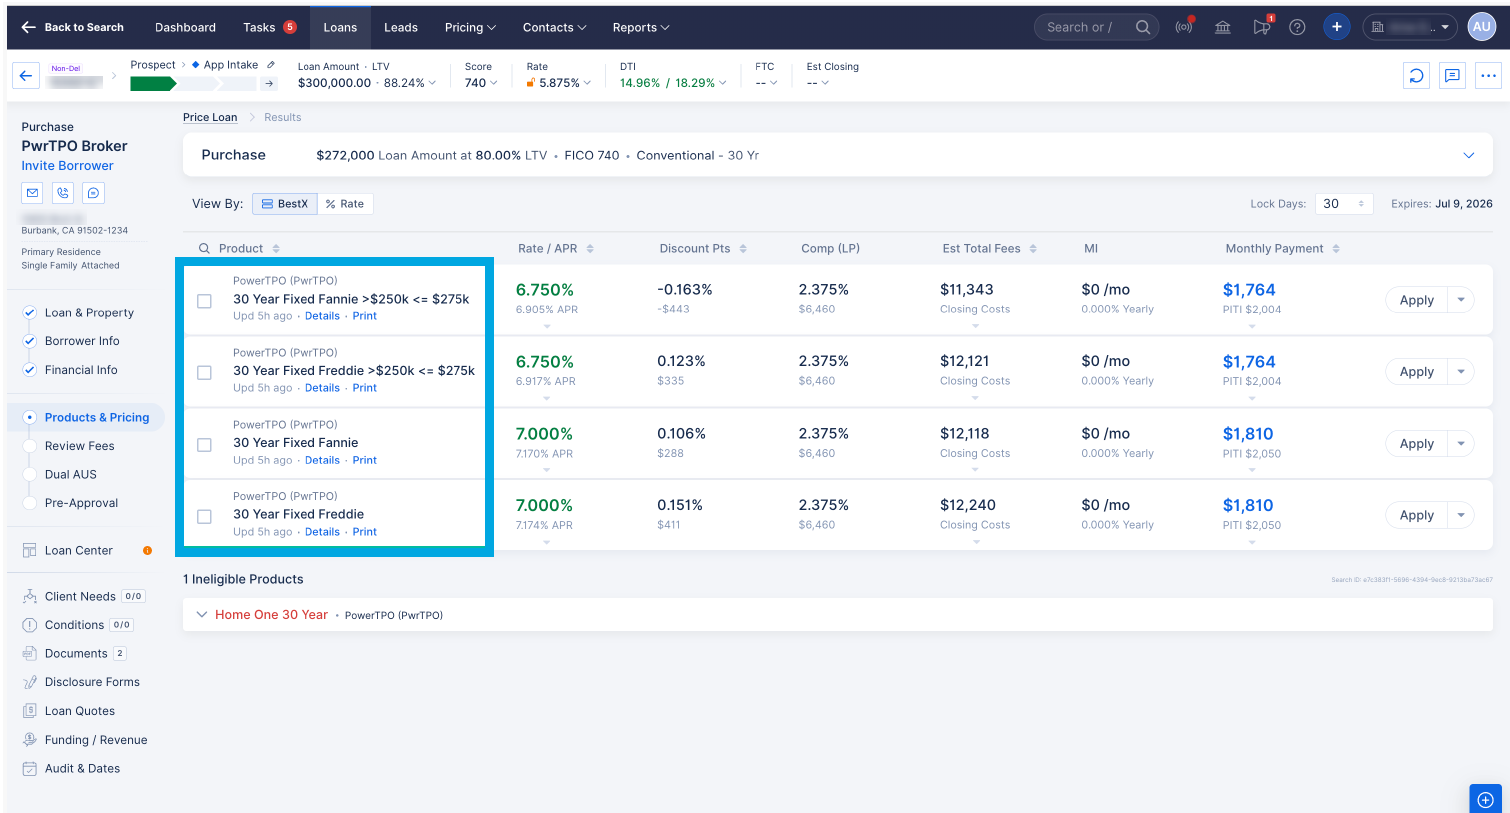
STEP 2- View Eligible Products
ARIVE displays all eligible PwrTPO products in real time, sorted by Best Execution (BestX). You can see rate, APR, discount points, compensation, estimated total fees, MI, and monthly payment side by side.
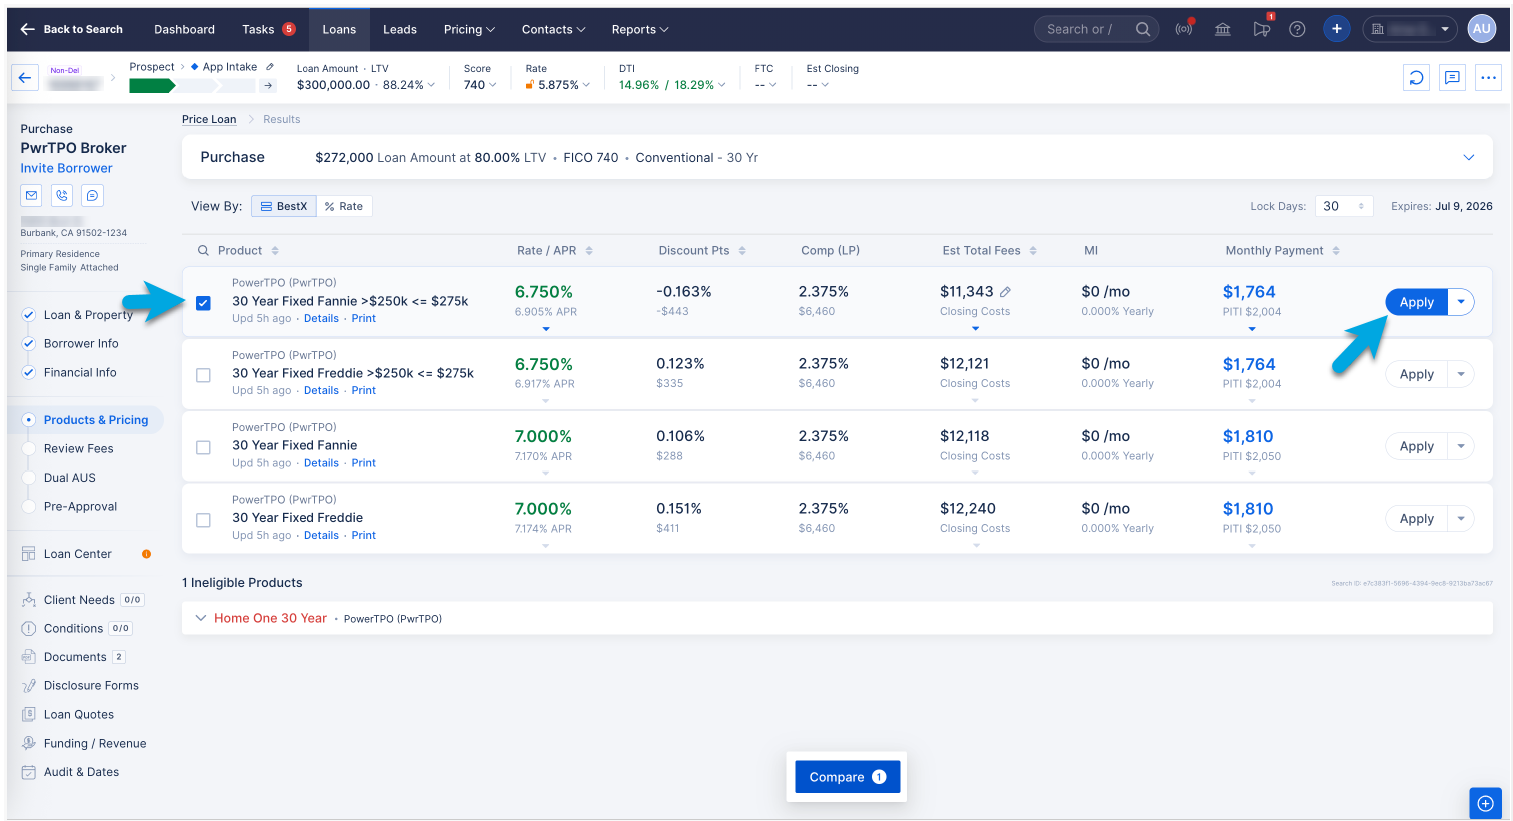
STEP 3- Select Your Rate and Click Apply
Check the box next to the product you want to select. Then click the Apply button on the right side of that row to apply it to the loan file.
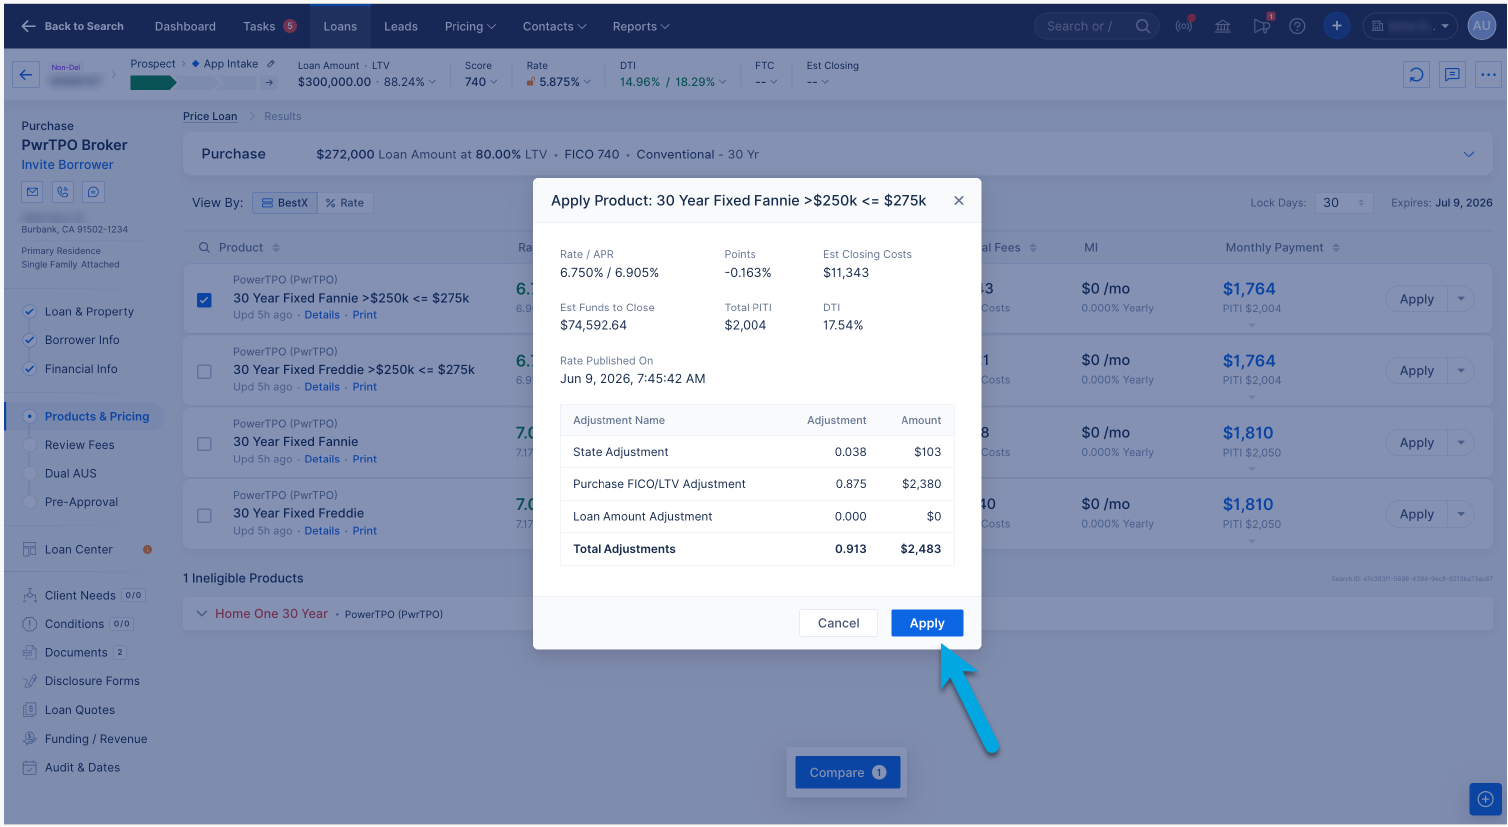
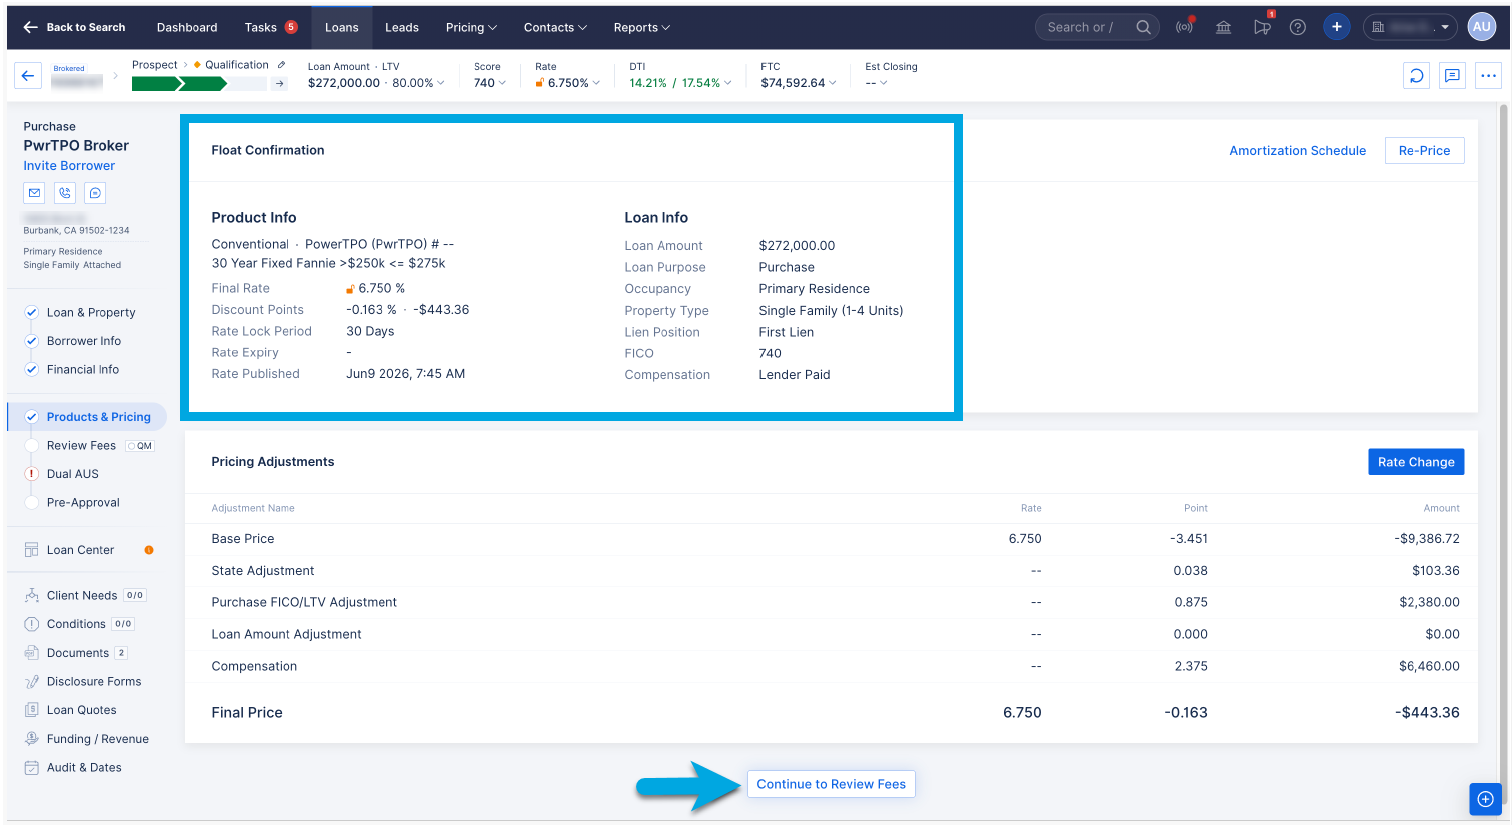
STEP 4 - Review Product Details and Confirm
A confirmation pop-up displays the full product details-rate/APR, points, estimated closing costs, funds to close, PITI, DTI, and all pricing adjustments. Review everything and click Apply to lock it to the file.
STEP 5- Loan File Is Updated
After applying the product, the loan file is updated with the Float Confirmation showing all Product Info and Loan Info. Review the pricing adjustments summary and click Continue to Review Fees to proceed.
PART 2: REGISTERING THE LOAN WITH PWRTPO
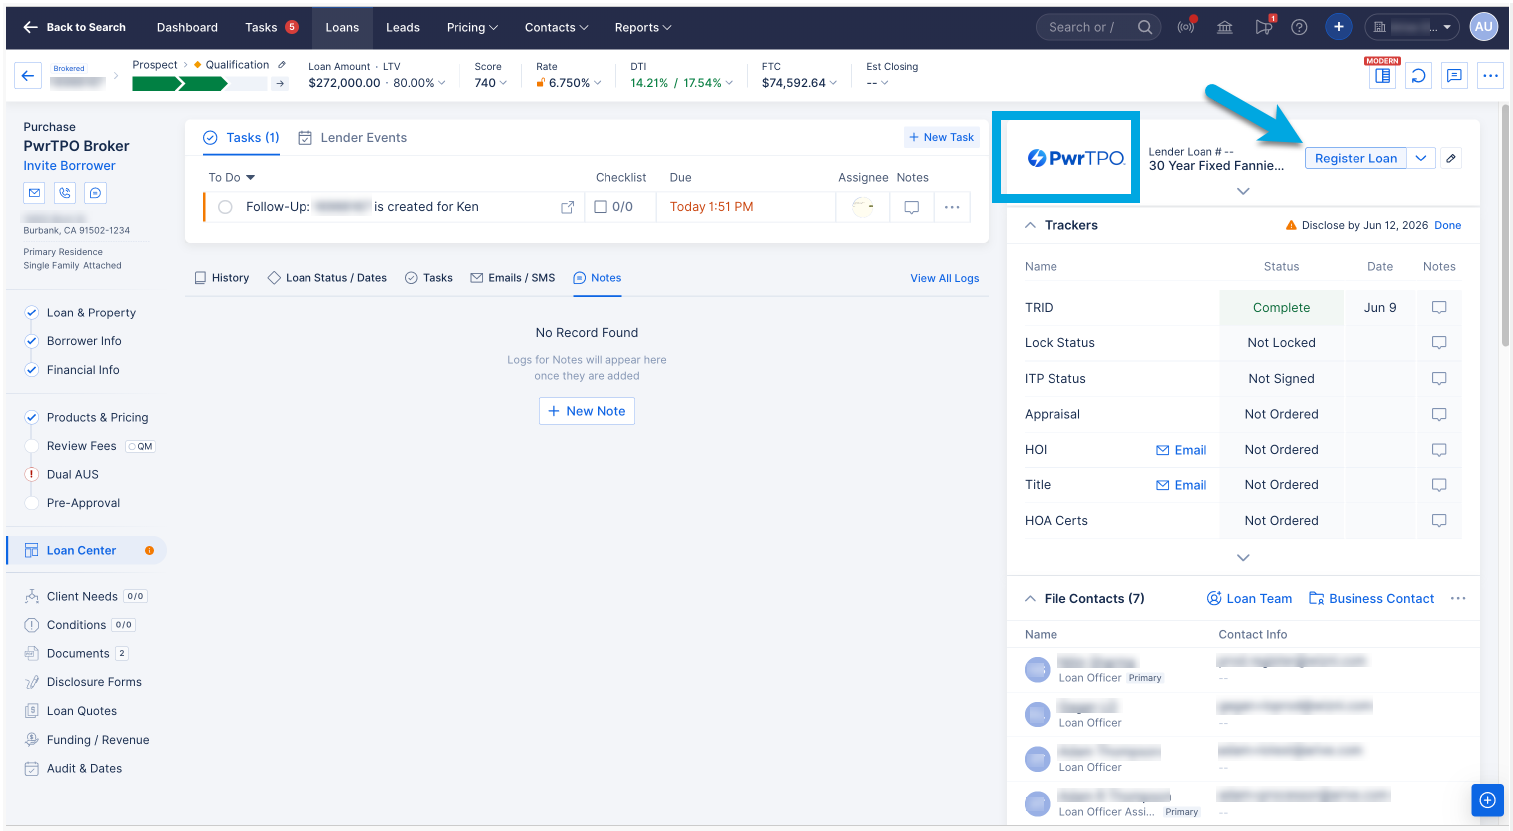
STEP 6 - Go to Loan Center and Click Register Loan
Navigate to the Loan Center tab in the left sidebar. In the upper right panel, you'll see the PwrTPO lender card. Click Register Loan. ARIVE will send the 3.4 MISMO file to PwrTPO automatically. No downloading or manual uploading required.
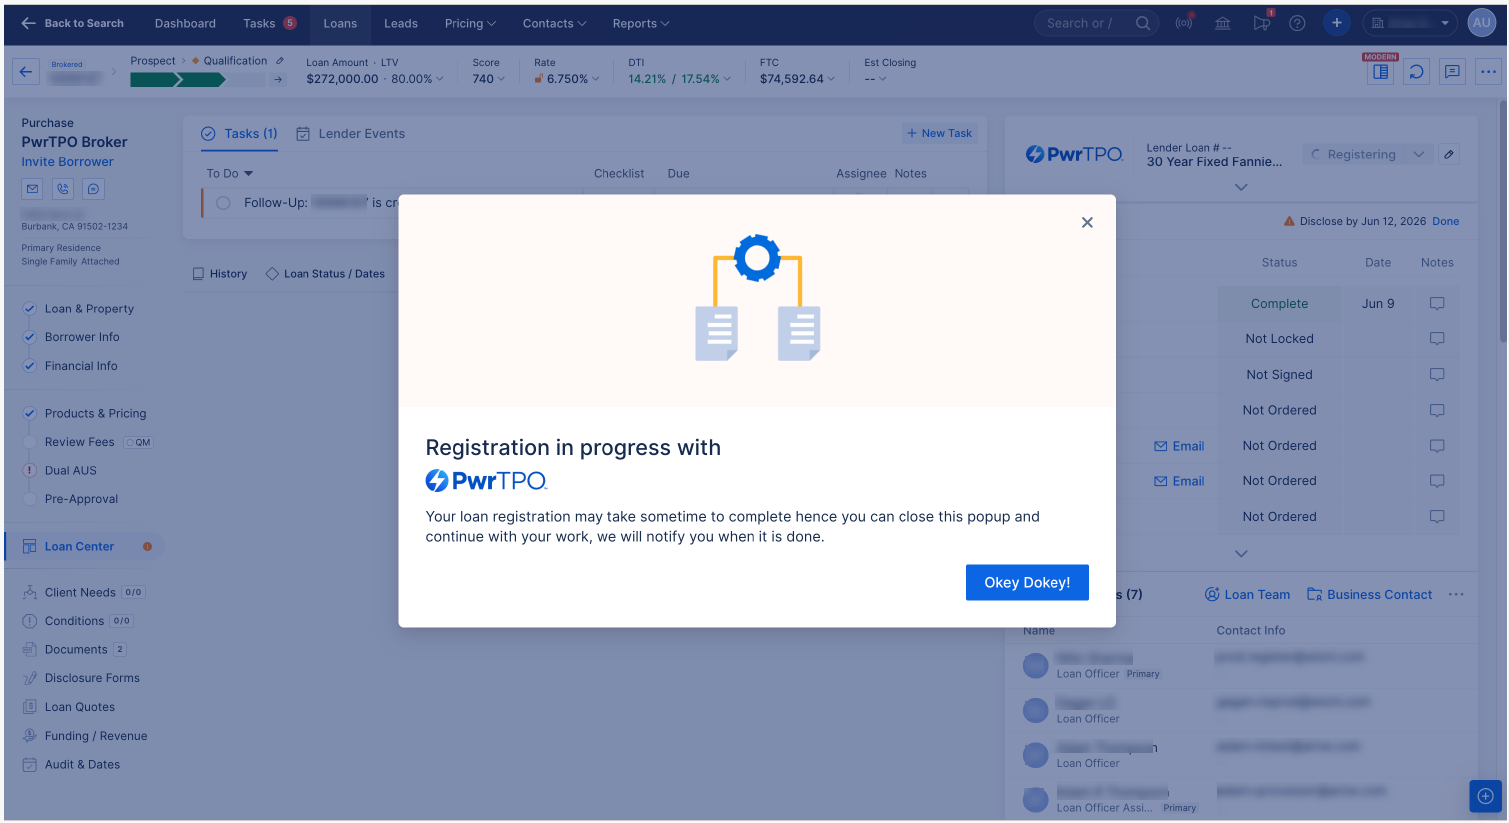
STEP 7 - Registration in Progress
ARIVE displays a "Registration in progress with PwrTPO" confirmation. This process may take a moment to complete. You can close this popup and continue working. ARIVE will notify you when registration is done.
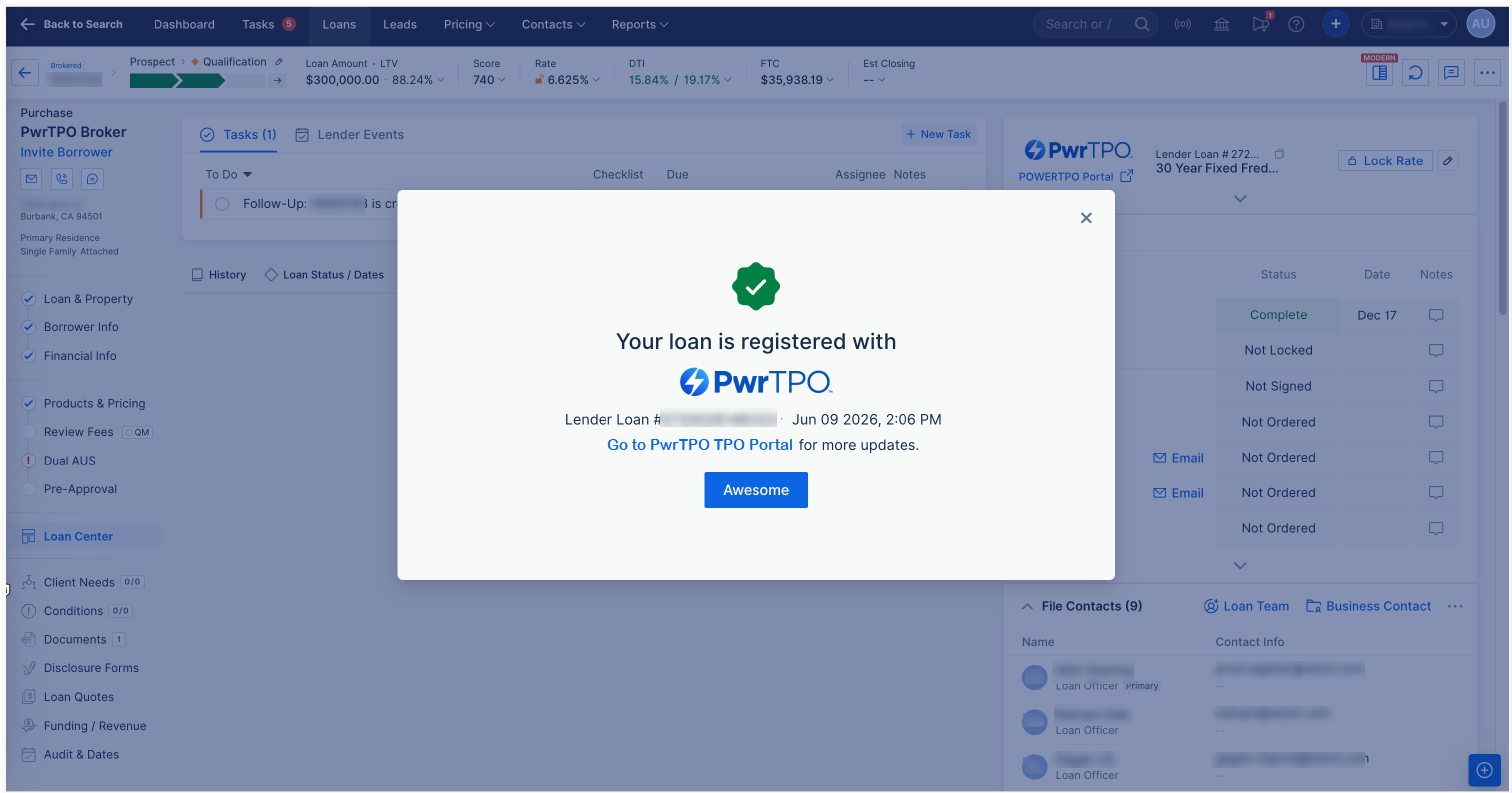
STEP 8- Registration Confirmed
Once complete, ARIVE confirms "Your loan is registered with PwrTPO" along with your assigned Lender Loan number and timestamp. A link to the PwrTPO portal is available for reference.
PART 3: SUBMITTING DOCUMENTS TO PWRTPO
STEP 9 Go to Documents Tab and Select Your Docs
Navigate to the Documents tab in the left sidebar. Check the box next to each document you want to submit to PwrTPO. At the bottom of the screen, click Upload to PwrTPO (PwrTPO).
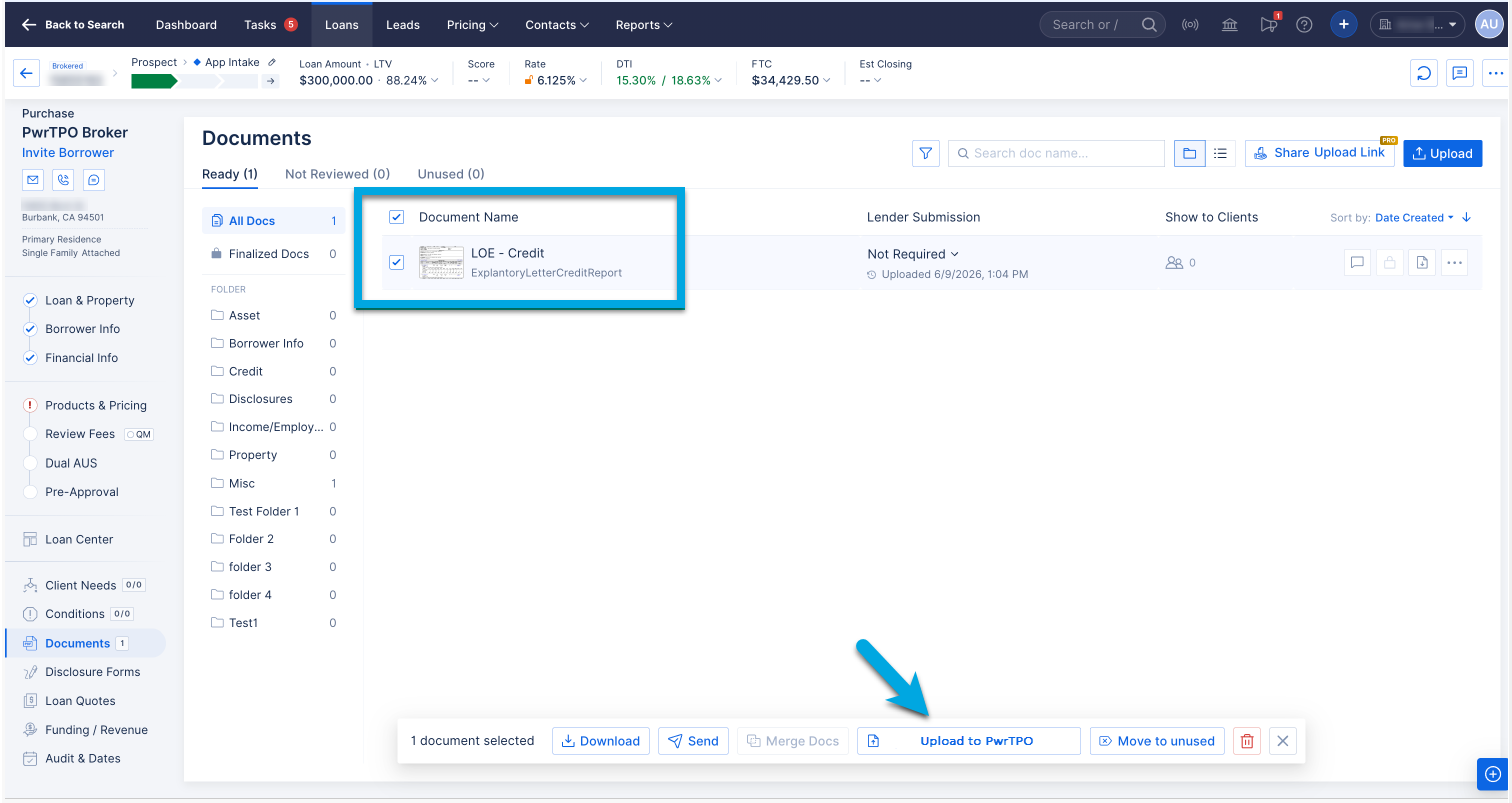
Note: This feature is only available for loans that were registered with PwrTPO through ARIVE.
STEP 10- Choose Submission Type and Start Upload
A pop-up will appear asking you to select the lender submission type for your documents. Choose the appropriate type; Initial Submission, PTD1–4, PTF, or Post Funding, then click Start Upload.
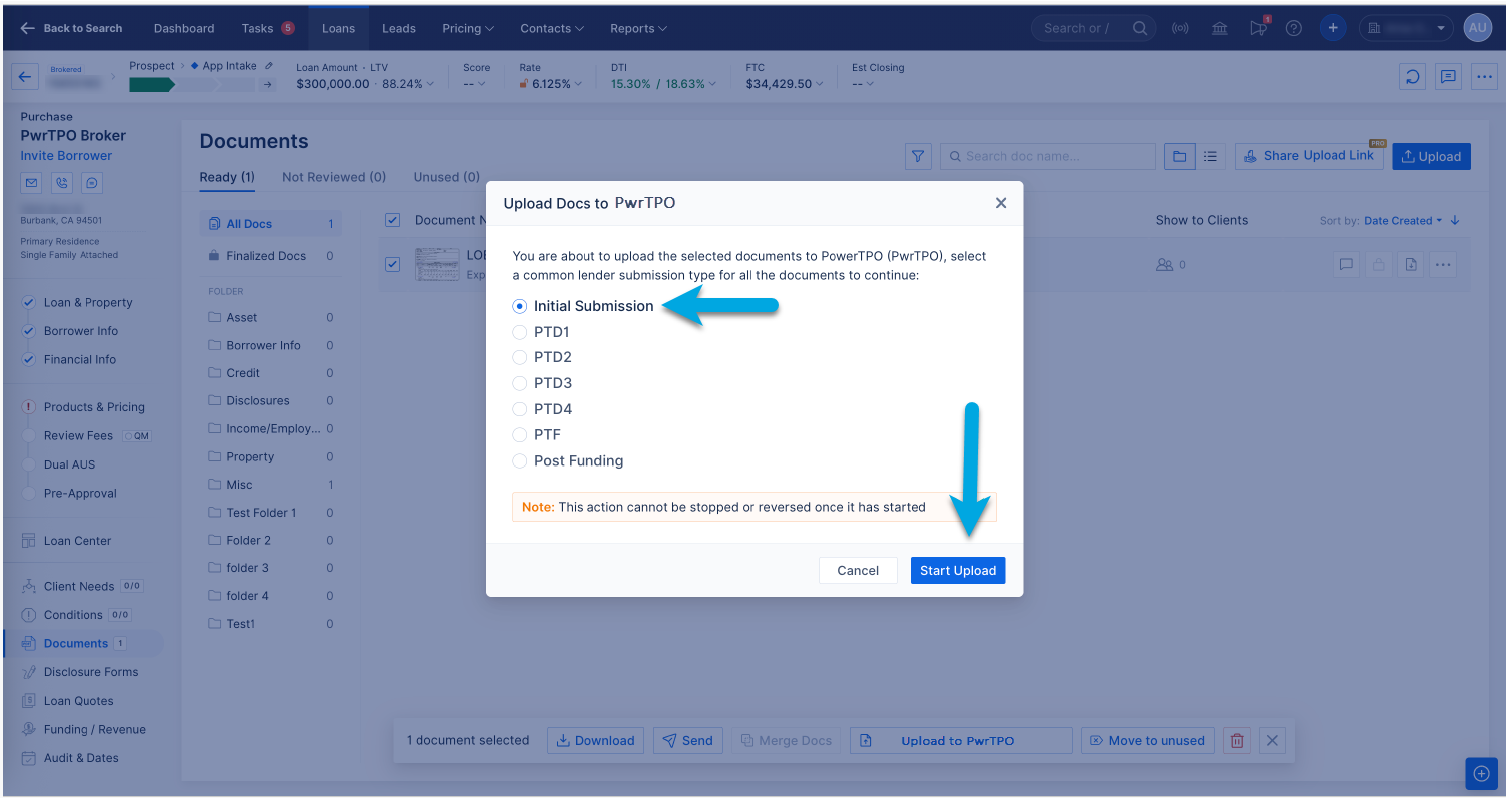
Note: This action cannot be stopped or reversed once started.
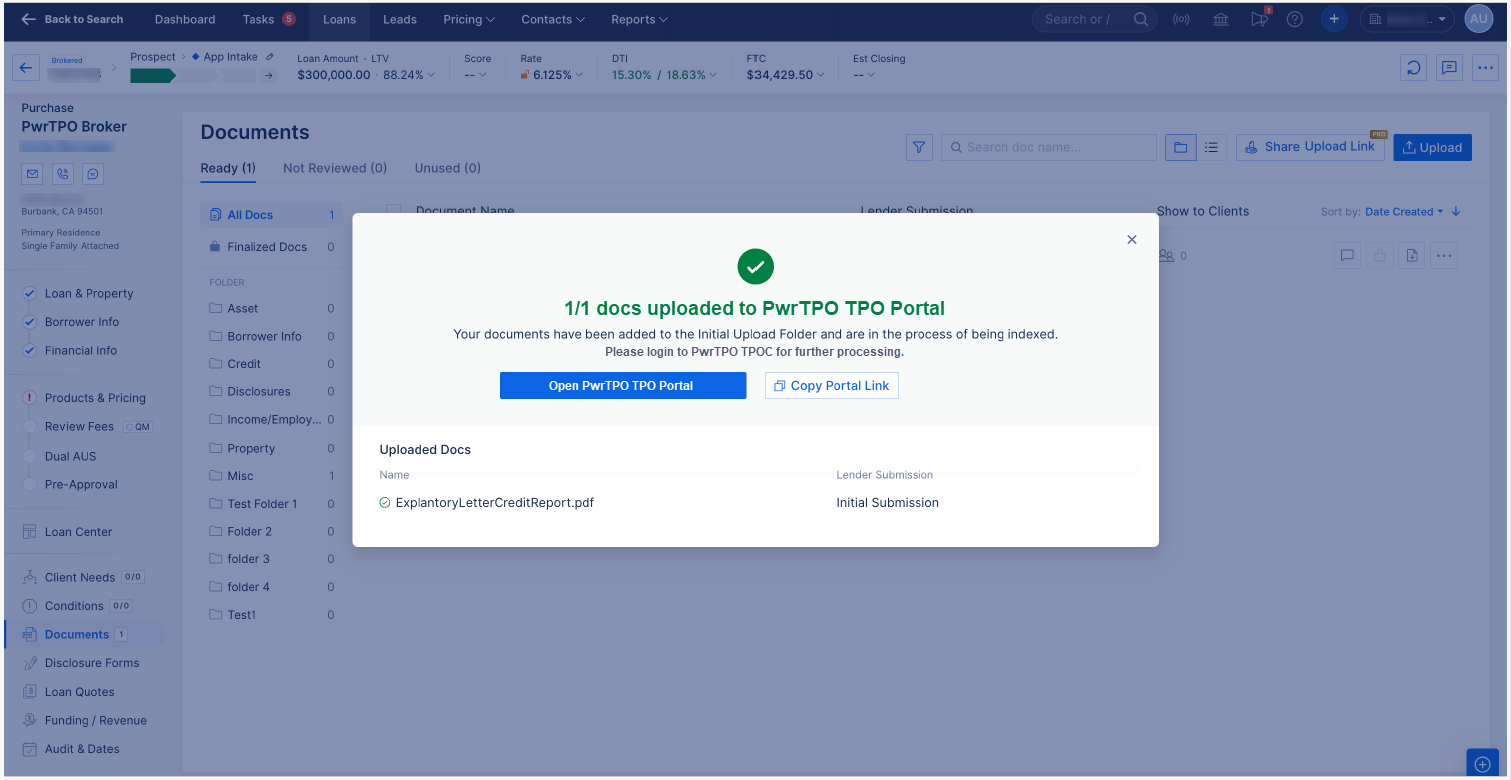
STEP 11- Upload Confirmed
ARIVE confirms your documents have been uploaded to the PwrTPO Portal and are being indexed. You can click Open PwrTPO Portal to view the file in our system or copy the portal link for reference.
Equal Housing Lender | NMLS ID #1124061